There is a problem with this Windows Installer package. A program required for this install to complete could not be run. Contact your support personnel or package vendor.Turns out, the AppLocale installer needs to be run with administrator privileges in order to complete applocale installation successfully on Windows Vista or Windows 7. However, apploc.msi (or any other .msi) does not offer you a “Run as administrator” on the right click menu. There are many ways around this, one being running a command prompt as an administrator and launching the installer through the prompt. AppLocale installer needs to be run with administrator privileges in order to install on Windows 7 and Windows Vista. If you are not familiar with command prompt, here is what to do:
- Hit the start button and type “cmd”, you will see “cmd.exe” under Programs
- Right click and select “Run as administrator” and click “Yes” on the confirmation window
- Run apploc.msi through this command prompt – if your apploc.msi is under “Downloads”, this command would be “C:\Users\user_name\Downloads\apploc.msi”
Download applocale Windows 7, Vista and XP
A lot of Japanese games require that you change your system locale to JP, this is how you do it – make sure to follow the instructions for your version of Windows.

- Go to the Control Panel
- Click on Regional and Language Options
- Click the Advanced tab, go to “Language for non-Unicode Programs”, and select “Japanese (Japan)” from the drop-down menu.
- Click OK
- Restart your computer

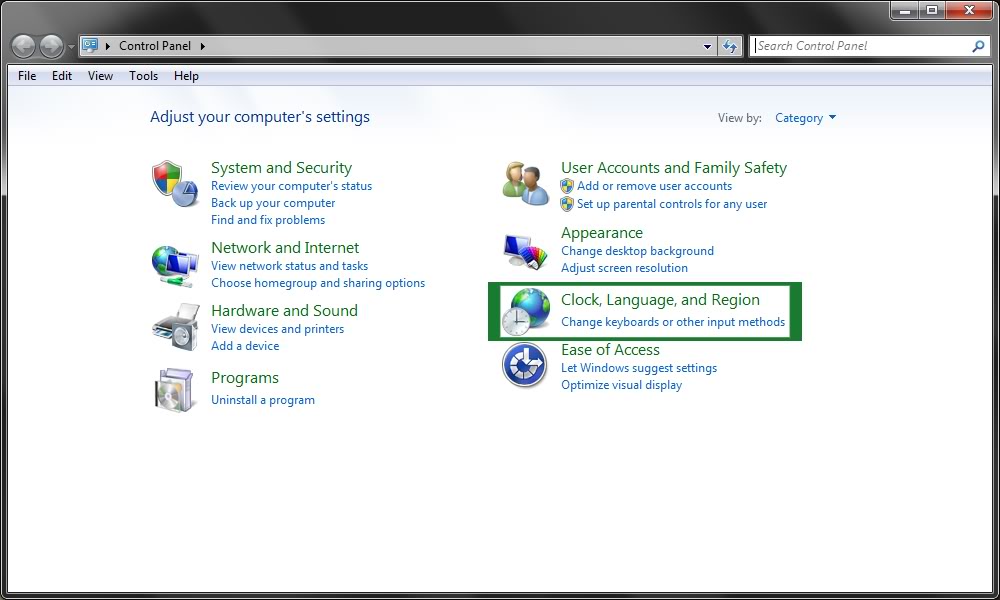
- Go to the Control Panel
- Click on Clock, Language and Region
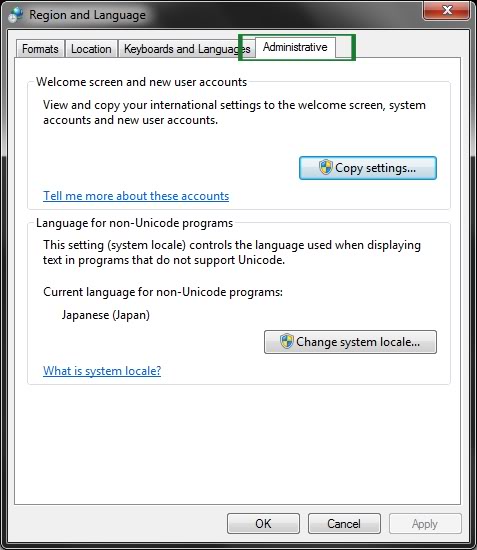
- Click on Regional and Language Options
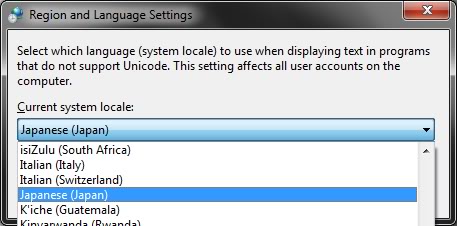
- Click the Administrative tab, go to “Change System Locale”, and select “Japanese (Japan)” from the drop-down menu.
- Click OK
- Restart your computer

- Go to the Control Panel
- Click on Regional and Language Options
- Click the Administrative tab, go to “Language for non-Unicode Programs”, and select “Japanese (Japan)” from the drop-down menu.
- Click OK
- Restart your computer

- Go to the Control Panel
- Click on Clock, Language and Region, then Region
- Click the Administrative tab, go to “Change System Locale”, and select “Japanese (Japan)” from the drop-down menu.
- Click OK
- Restart your computer

This process is completely harmless to your computer! It can be reversed at any time!
All you have to do is complete the same steps but select English (United States).
After changing the locale to Japanese your forward slash (\) may turn into a yen symbol and some installers may be in Japanese. This is normal. Everything else will still display in English.


